Wednesday, 13 January 2016

Bring it on

7 Deadly s{K}ins has on sale at The Staff Sales Room Maryna skin that comes in 30 skins in 3 tones,with and without cleavages, and tango and phatazz appliers.


Besides that, there is a huge sales going on at the 7 Deadly s{K}ins store right now. There are also MM boards, a Riot Vendor and 2 Gacha's home from events for all. Both gorgeous Isadora and Eska girls can be yours for just 100L per play. 

So head down to 7 Deadly s{K}ins mainstore now and have fun shopping! 

Style Card
Skin
7 Deadly s{K}ins -Maryna Caramel v1 CL @ The Staff Sales Room

Skin appliers
7 Deadly s{K}ins ~ Maitreya applier [Caramel]
7 Deadly s{K}ins ~ SLINK hands & feet HUD [Caramel]

Hair
Besom ~ Berry @ FaMeshed


Monday, 11 January 2016

I want you to see me this way

When I first received the Elle Skirt from Lybra, I was totally amazed by its smooth silk texture and the colour hud that comes with it. With 36 colours option for both the skirt and the bow, you can easily create a unique skirt each time you wear it. Best of all, the skirt is made to fit Slink hourglass, original, Eve Slim and Maitreya mesh body.


As I was shopping around to find a top to go with the Elle skirt, I chanced upon the FaMeshed group gift from Valentina E. Couture. The mesh jacket comes in one colour but it matches perfectly. 

Now all I need is a pair of sexy heels from VG Shoes. Tokyo Heels comes in 7 colours in both neon and leather texture and it will be on sale on Jan 11 at the Black Dot Event.


Style Card
Outfit
Top ~ V.e. Celine Jacket [Ocean] *FREE gift @ FaMeshed
Skirt ~ Lybra Elle Skirt (fit. Maitreya) @ The Chapter Four

Accessories
Clockhaus ~ Minimal Rings [Silver] *FREE gift @ Cosmopolitan Events

Shoe
VG Shoes ~ Tokyo [Nude] *NEW EXCLUSIVE @ Black Dot 
[Event starts at Jan 11]

Hair
Besom ~ Berry @ FaMeshed

Skin
7 Deadly s{K}ins -Marina Caramel v1 CL @ The Staff Sales Room

Skin appliers
7 Deadly s{K}ins ~ Maitreya applier [Caramel]
7 Deadly s{K}ins ~ SLINK hands & feet HUD [Caramel]


Photography tips #3 - Derender

By Scott Nobody

In real life photography, a little pre-photoshopping on location is time saved when editing, and by that I mean removing things (if possible of course) that has to be fixed in post editing anyway. So before the shot is actually taken, remove or fix things such as an odd twig, toys in the background, garbage, or stray hair on the model etc. Basically try and get rid of anything that doesn't belong in the final picture. You'll thank your self later if you do.

Until just recently, I thought that was more or less impossible in SL without having editing rights, but a shooting sessions with Debbie Jasper over the holidays taught me something very cool. I might be the noob here for not knowing this clever little trick, but I'm okay with that :) I'm always willing to learn and share.

The session we were on was shot over the Christmas holidays. We were shooting a gown Debbie was blogging, and the problem was there were Christmas decorations and other items that just didn't fit the theme of the gown. After have shot from a few different angles I just couldn't get a shot I liked because of the items on location. Then Debbie said - "Just de-render temporarily".  /Me: "Huh?" So she showed me, and low and behold, life just got a little bit easier.

I found some of the raw photo's from that first session. In this shot, the cat on the piano and the lamp at the end of the stage is bugging me. But to clone those items out in Photoshop looks like a lot of work so kept looking for angles where these items weren't visible, but that of course changed the look and view of the gown.


After Debbie's little revelation we went back the next day. Below is another raw shot from the second session. The cat and the lamp has been de-rendered temporarily making the post editing a lot easier. 


Here's how do this in Firestorm: 
  • Right click on the item that is in your frame, or picture that you want to remove. 
  • Click MORE in the circle - twice
  • Click DERENDER 
  • Finally click TEMPORARY
And the item such as a pose-ball, tip jar or perhaps a person in the back ground is gone. You have a much cleaner raw photo to work with in Photoshop.

Thank you Debbie :)

One thing to keep in mind when doing this, is to be very careful what you click on. I lost the floor the first time I tried but a quick relog fixed it, and I could start over with de-rendering unwanted items again. 

Here's a link to the gown Debbie blogged.

This blog post was also posted on http://debbiejasper16.blogspot.sg

Thursday, 7 January 2016

A drive away from home


Style Card
Outfit
[[ Masoom ]] ~ Wrinkled dress Maitreya Streaked *NEW RELEASE
[for Maitreya and Slink Physique]

Shoe
RAYNE ~ Toastie Boots blue Maitreya *NEW RELEASE
[for Slink, Maitreya and TMP]

Hair
pr!tty ~ Layley


Picture taken at Wayward Market 


Monday, 4 January 2016

Jadis

This is one of the most fascinating and fun ensemble that I have ever blogged. Ghee's Jadis gown comes with a SnowGlobe that I can wear and instantly I become a barbie doll in a musical globe that plays musical notes when you touch the key at the side. Touch the glass and you can start or stop the snow inside the globe. You can also make the barbie doll 'dance' in the 6 preset poses by clicking on the base of the globe.

I had some friends over when I was taking pictures last night and we all had such a great fun taking turns to jump into the globe. It is really a nice add on to any house's decoration. :D


Style Card
Outfit
Ghee ~ Jadis gown *animated textures
[comes with fur collar, cuffs, opera length gloves, snowflake string and wearable animated snow] 

Hair
Tableau Vivant ~ Scarlett hair 


A brand new day

Happy New Year! It's a brand new year with new hope and opportunities. There is so much I want to do both in RL and SL. I just need to stay more focus. :D 

For my first post of the year, I am showing you this fabulous winter dress from Ghee. It is a material enabled rigged mesh dress that comes with matching hat, fur shawl and trimmed fur boots. The unique part of this outfit is that the alpha hides the avatar arms and so it looks like you are walking around with your hands in the pocket. How cool. 


Style Card
Outfit
Ghee ~ Pink Ice Nikita Dress comes with shawl and hat @ The Instruments 

Shoe
Ghee ~ Nikita Boots Pink Ice (Slink High) *Sold separately The Instruments 

Picture taken at Calas Galadhon Park Sims

Sunday, 3 January 2016

Photography tips #2 - Watch your background.

By Scott Nobody

This time we'll take a look at another simple way of making your Second Life photos turn out better. In photography, the background is or can be just as important as the subject. Especially when the background is interfering with the subject in a way that is unintentional.

Its a simple tip really. Lets call it the "Keep the head in a clean spot" tip. What I mean by that is, when you shoot your self or another person, try and keep the background behind the subjects head clean so nothing appears to be growing out of, sticking in to, or going through their head. A good example could be tree branches that mysteriously protrude from the subjects head, or a lamppost sticking out of the top of the head.
Here the trunk of the tree is growing out of my head.
It is fairly easy to avoid this situation. A simple change of camera angle, or perhaps make the subject take a few steps to one or the other side will save a lot of work later in Photoshop.

Even though the back ground is messy, it is uniform behind the head, and the background is also been blurred by using the DoF feature in Firestorms Phototools
If it is impossible to keep a separation between the subject and the background, turning on the depth of field option in SL will help making the final image more pleasing to the eye.The trick here is that the eye will seek out sharp details before blurry details, and because of that we have a seperation between the back ground and the subject.. Still, moving the camera slightly will eliminate the unfortunate tree growing out of the head completely.

Even with DoF enabled, the tree trunk is still where is shouldn't be, however a better version that with the DoF disabled.


Again, tree in a position where  they shouldn't be any.

A slight move with the camera and the head it is clear, however we have another problem  - horizon lines going through the head.
 Another scenario to keep an eye out for is horizon lines going through the head of a subject, as in the line between the sky and the ocean for example. A slight move with the camera and the problem is gone.
Horizon lines through the head are almost as bed as trees and lamp posts.

Camera is re-positioned for a much better end result.


This post was also posted on http://scottnobody.blogspot.com/

Thursday, 31 December 2015

Mistress of Ice

Masoom's Mistress of Ice outfit is 100 % original Fitted mesh designed for Maitreya Lara and Slink Physique body. It is materials enabled and is available exclusive at the Winter gacha Festival till 31st December. 


Style Card
Outfit 
Masoom ¬ Mistress of Ice for Maitreya 
[comes with the gloves, cape and boots] 
EXCLUSIVE @

Hair
[elikatira] ¬ Dylan

Skin
7 Deadly s{K}ins ¬ Danica caramel V1 @ Rock Factory

Skin Appliers
7 Deadly s{K}ins ¬ Maitreya applier [Caramel]

Picture 


Wednesday, 30 December 2015

The Road Ahead

"Supporting Brandy Maltas (Kalli Birman in Second Life) as she battles metastatic uterine cancer that has spread to her liver. Shopping & live music with all proceeds to help Brandy & her children. She has helped so many of us over the years, now it’s our turn to help her!"


In support of this charitable event, AZUL has offered 100% of the proceeds for the sale of this LIMITED EDITION Electra MeshDress. The layers of chiffon skirt flow with the wind as you walk creating an illusion of elegance. A perfect gown for the New Year Countdown.


Style Card 
Debbie's
Outfit
AZUL ¬ Electra MeshDress S/Amethyst+Onyx LIMITED EDITION 

Hair
Pepe Hair ¬ Feline - Fitted Mesh

Skin
7 Deadly s{K}ins ¬ Ashley v1 pineapple @ Lubbly Jubblies

Skin Appliers
7 Deadly s{K}ins ¬ Maitreya applier [Pineapple]

Scott's
Outfit
L&B  ¬ Modern Open Black Tux Jacket Combo and Pants 

Hair
Exile ¬ AJ:Autumn

Picture Taken at Garden of GreenBurg


For more info about the charity event

Sunday, 27 December 2015

Photography tips #1 - Rule of thirds

By Scott Nobody

Second Life photography is so much fun, and lots of people do it. Here is a way of taking real life photography tips and bringing it into Second Life.

One of the most simple ways of improving your images is to use the "rule of thirds". When you shoot a picture in SL, typically the object ends up dead center of the shot if you don't move your camera. That is not necessarily the best spot for an interesting image. Watch any movie, magazine, billboard, even the news on TV. Pretty much everywhere, this rule is applied in some form or another.

The rule of third grid looks like this:
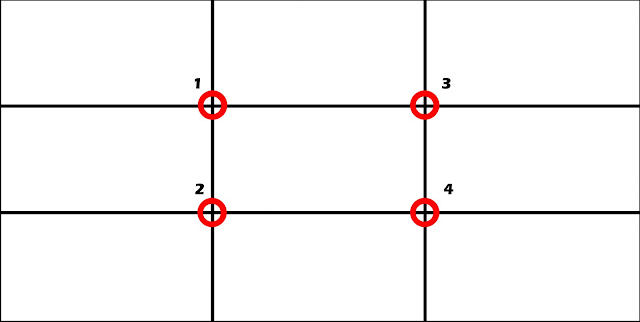

When you're framing your shot, imagine four lines that is about 1/3 of the entire length or height in from either edge. Where those lines intersect, you have a focal point (red circle). A point where the eye almost automatically goes to right away when we look at an image. You can use this to your advantage and position your object, in one of those intersections. It can be in anyone of the four intersections, just pick one that looks good to you. 

Fun fact: Most people will look at the top left intersection first, then the bottom left, then the top right and so on. You will quickly find out using this method, your images will look more pleasing to the eye.


The lines are also very helpful. In landscape shots for example, you want to the horizon line to run along one of the two horizontal lines in the grid - a third from either the top or the bottom.
The vertical lines can be used to line up a tall structure or a person in just the right spot.
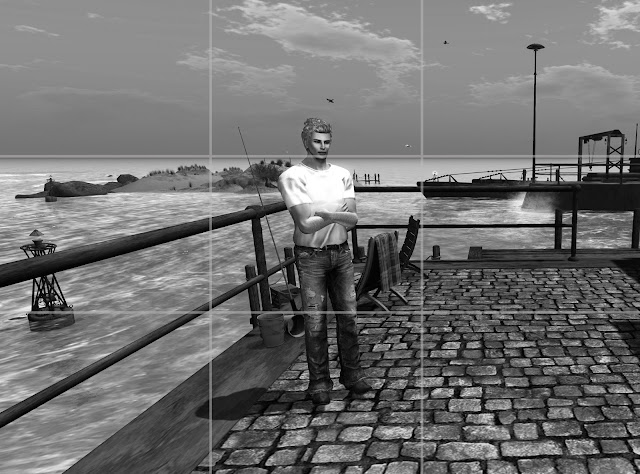


Not the optimal position of the subject, even though the horizon is located along the right line.
If you know you are going to be editing the image in Photoshop or Gimp later, try to make sure to leave extra room for a crop if that's is your intentions. With the crop tool in Photoshop or Gimp you can easy put the object in the desired spot, however, having not done that at the time of shooting, you will now have eliminated a lot of good pixels. Something to think about :)

Last but not least,  - this is a more a guide than a rule. - Rules are there to be broken, and very often you will get an interesting result by doing just that. An example on that could be a shot where the back ground is 100% symmetric or perhaps there is a perfect reflection. But more often than not, using this guide, or rule, will give you a better image, and should result in more favs on Flickr.

Bonus tip: Both Gimp and Photoshop has the rule of third as a guide preset already built in. Here's how you turn them on when you're using the crop tool.

Photoshop:
Select the crop tool, (C) - in the tool bar, click the mesh looking icon, and select the Rule of Third grid. Now drag from corner to corner to select the entire image. As soon as you let go of your mouse the grid will pop up and you can now adjust the handles on each side of the cropping window to place the image the way you like it.


Gimp:
Click the pen cutter like tool....?! (Shift+C) to select the crop tool. In the drop down list, chose Rule of Thirds guides. Now drag over the entire image and your grid will be drawn out. Now you can adjust the crop by using the handles in each corner to get the composition right.